Fix PST Indexing Problem in Outlook 2016 With the Best Solutions
admin | October 21st, 2017 | Windows Outlook
Troubleshoot PST Indexing Problem in Outlook 2016 – Measures to Resolve
There are few common issues faced by many Microsoft users nowadays such as Outlook 2013 indexing not working, Outlook 2010 indexing rebuild not working, PST indexing problem in Outlook 2016, etc. This blog is written to resolve such Outlook PST errors to repair/fix indexing in Outlook 2016, 2013, 2010, 2007.
“I am facing the problem with Microsoft Outlook 2013 email client. Whenever I search for a message in its instant searching box, I encounter an error statement i.e., Outlook instant search not working. Can anyone guide me a technique to troubleshoot this interrupted situation?”
Many Outlook users put forward this query in which they face different problems with the searching feature. Few shocking statements like no match found, the search results not complete, instant searching not working, etc., interrupts one from accomplishing their task. Therefore, here we are presenting all possible measures to fix Outlook PST indexing error.
Different Approaches to Troubleshoot PST Indexing Problem in Outlook 2016
Not only one but, there are several causes involved behind the occurrence of this issue. Hence, the bulk of measures are available through which users will be able to repair indexing in Outlook 2010.
Method 1: Completely Examine Outlook Indexing
The method varies with the version of Microsoft Outlook.
For Outlook 2007:
- Open Outlook and click on Tools >> Search >> Instant Search.
- The Microsoft Outlook dialog box will appear in which you have to check the following text carefully:

For Outlook 2010, 2013, and 2016:
- Launch MS Outlook and select the Search box.
- Click on Select >> Select Tools >> Indexing Status.
- Now an Indexing Status dialog will appear in which you will find following text:

- In case MS Outlook does not finishes the indexing functionality then, note down the left items and wait for at least 5 minutes. Check the process again and if you are facing the same problem then, move to next step.
Method 2: Properly Configure Indexing Options
An MSG file is associated with Office Outlook MSG IFilter, which originates at the time of program installation. This filter activates the WDS index contents, which are saved in PST and OST file. Initially, Outlook works with OST file when a new profile is connected with Exchange account. Well, if you have already configured Outlook with an Exchange account (having cached Exchange mode enabled) then, use following steps :
- Terminate MS Outlook and open indexing options with help of following guidelines :
- Windows 10 or 8: Go to Start screen, type indexing options and under Search section, click on Settings >> Settings Options.
- Windows 7 or Vista: Click on Start icon and type indexing options in the searching text box. Press Enter.
- Windows XP: Go to Start >> Settings >> Control Panel and double-click on Indexing Options.
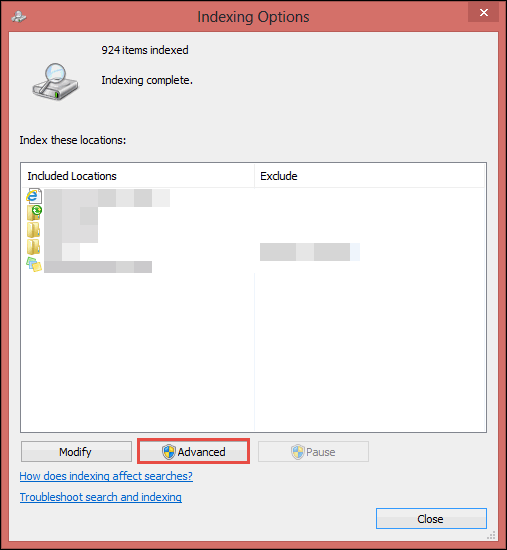
- An Indexing Options window will appear in which you have to click on Advanced button.
- Click on the File Types tab and search for .msg in the column of Extension.
- When you find the desired file extension, click on it and check that Index Properties and File Content option is activated.
- Click on OK >> Close.
Method 3: Add MS Outlook Items in Indexing
Here, you will find a method to check that whether the Outlook contents are indexed or not.
Note: The method is not applicable for Outlook 2013 users. It is so because the application blocks the ability to search for MS Outlook data via WDS.
Verify that Outlook data items are indexed or not, with help of following steps :
- Close MS Outlook and open Indexing Options wizard with help of illustrated method. The method is described in steps of Method (2).
- Check whether MS Outlook is listed in the Included Locations column or not. If not then, proceed further with Step (3); else jump to Method (4).
- Click on Modify button and hit on activate the checkbox that is located just next to the Outlook.
- Update the made changes by clicking on OK >> Close.
Through the following steps to verify whether Outlook is properly configured with the returned outcome or not :
- For Outlook 2016, 2013, and 2010 Users :
- Open Outlook on your machine and click on the Search box.
- Hit on Search tab >> Search Tools >> Locations to Search.
- Now select add or remove data files
- For Outlook 2007 Users :
- Launch MS Outlook on your PC and click on Tools >> Instant Search >> Search Options.
- Choose add/remove data files.
Method 4: Rebuilding of Search Catalog
If an individual finds that indexing is stuck and incomplete then, rebuild the searching catalog with help of following steps :
- Close Microsoft Outlook completely and open Indexing Options window.
- Click on Modify button, clear the checkbox just next to Outlook and click on OK.
- Hit Advanced and then choose Rebuild option.
- Click on OK >> Close button.
If the indexing process excludes Outlook data items then, contact the support team of Microsoft for troubleshooting the problem.
Method 5: Examine the Scope of Search
The searching scope affects immediate searching that we perform. Therefore, it is the last measure to troubleshoot the problem manually.
- For Outlook 2007 Users:
- Click on the arrow that is located just next to the All Mail Items text in Outlook.
- Select data files for adding or removing them.
- For Outlook 2010 Users:
- Hit on the Search box of MS Outlook and then on the Search tab.
- The current scope is shown by the Scope group, which can be any one of the following :

- For Outlook 2013 / 2016 Users:
- Click on the Outlook’s Search box and select Search tab.
- The current scope is shown by the Scope group, which can be any one of the following :
You can alter the existing scope by clicking on the drop-down button, which is placed just next to Search box. In order to do this, follow below-mentioned instructions :
- Go to File >> Options and then choose Search in the Outlook Options dialog box.
- Set the Include results only from to any one of the following option under Results section :

Method 6: Tool to Repair/Fix Indexing in Outlook 2016, 2013, 2010, 2007
PST Indexing problem in Outlook 2016 and its below versions can also be rebuild/resolved by using a third-party utility. Outlook PST Repair software offers an accurate approach to fix this indexing problem. The product is designed and coded with highly advanced algorithms, which are capable of troubleshooting all sever problems from the .pst file. In a very smart way, it retrieves all the deleted messages and other items while processing the file. Apart from resolving Outlook PST indexing error, the tool is capable of repairing problems like synchronization errors, CRC error, etc.
Conclusion
Users are advised to go for only that approach, which they find reliable for them. This is suggested because if something goes wrong while implementing manual measures then, it will affect other applications of the PC. It is going to be hard for a non-technical person to carry out the manual technique therefore, an automated approach is also recommended here. The application will definitely fix Outlook PST indexing error without any hassle. After going through the above article, it can be concluded that the Microsoft users can easily rebuild/troubleshoot PST indexing problem in Outlook 2016 and it’s below versions also.